
How to get started with advanced LEGO building
You’ve seen them. Ed Diments large scale ships, Nathan Sawaya’s artful sculptures, Keith Goldman’s cyberpunk dioramas and many other fantastic LEGO creations. Don't you want to build something similar?

There is a lot to take in when you begin to explore the LEGO world. It's tough to know where to start. This article will get you familiar with key LEGO concepts and point you to many resources. In short: it'll provide you with a solid framework so you can explore advanced LEGO building for real.
We’ll assume that you’ve assembled a couple of official models and have access to a little LEGO, but not much more. First we’ll get to know the pieces and then move on to more advanced concepts. So brew yourself a pot of tea and buckle up - let's get to it!
Brick vocabulary
Studs and tubes
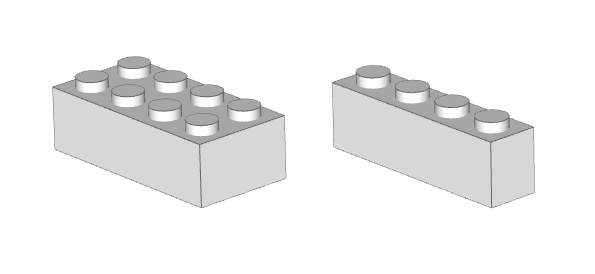
If you look at a standard LEGO piece you’ll see that there is a top and a bottom. The top has small protrusions - these are called studs.
The bottom is completely different. There you’ll find holes in various configurations. The central part of these are called tubes. Smaller bricks have variants called bars.
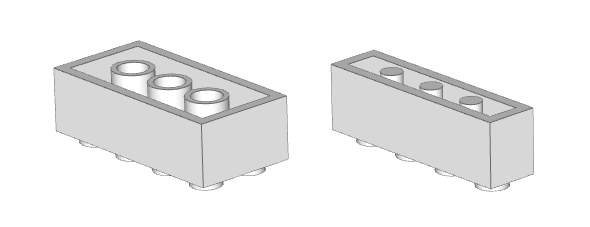
Studs and tubes form the basis of the interlocking system that is LEGO. These terms are important to know and understand - not only do they guarantee a very precise amount of clutch, but we’ll also use these terms when we classify different elements. First, we use the studs to get the size.
Piece sizes
If you look at a few pieces you’ll notice that they come in many different sizes. Here are three:
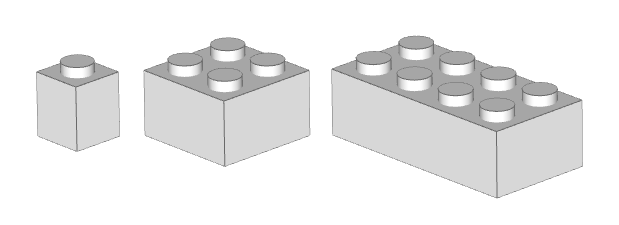
We need a way to tell these apart. This is done by counting the number of studs they have on each axis, with the lowest amount first. The first piece have only one stud, so we’ll call that a 1x1. The second piece have two studs on the first axis and two on the second, so that is a 2x2. The third? A 2x4. Pretty easy, right? (Oh, and if you want someone to pass you a piece you say ”hey, hand me that two-by-four over there”.)
If you want to refer to a piece size where only one row of studs is defined, you can substitute the second number with N, for number. Here are a few pieces that can all be classified as 2xN, for instance:

We’ll use these measurements and combine them with a piece type to get a full classification.
Piece types
In addition to the size we need to know the piece type. Have a look at these two pieces:
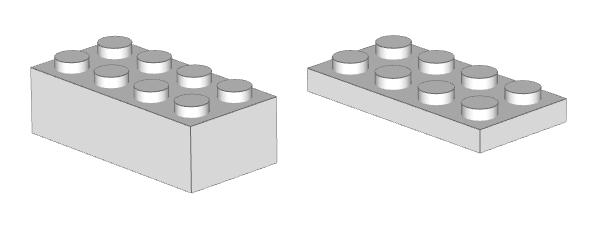
By counting the studs we see that they’re both 2x4’s, and yet they’re not the same. So how do we separate them? One is obviously thicker than the other - that’s a brick. The thinner one is a plate. Combined with the size, we’ve got a 2x4 brick and a 2x4 plate.
There are a few types. Let’s have a look at the most common ones.

Bricks are the standard LEGO pieces. They come in many sizes, from 1xN to 2xN and beyond.

Plates are the thinner variants of bricks. Three plates stacked on top of each other make a brick.

Tiles are plates that doesn’t have any studs. Sometimes they have patterns instead, like a computer keyboard. Most people treat tiles as a separate category, but some think of these as modified plates. More on modified pieces later.
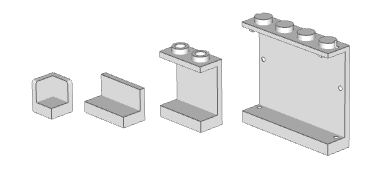
Panels can sometimes be confused with tiles, but they’re actually a different set of elements. Some have studs, and they come in many different variations.

Slopes are bricks that form a small hill. They come in many different angles and sizes, but each fall in one of three sub-categories: regular, inverted and curved.
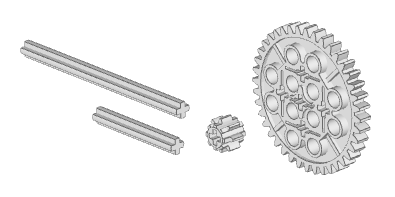
Technic pieces are a class of their own. Some of the common ones are axles and gears, though there are many others.
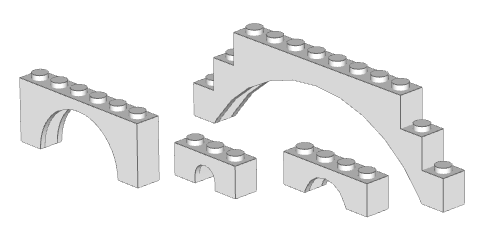
Arches are bricks that have built in curves. Useful for sculpting and architectural details.
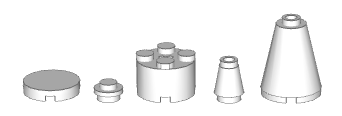
Cylinders and cones are cylindrical bricks, plates and slopes.
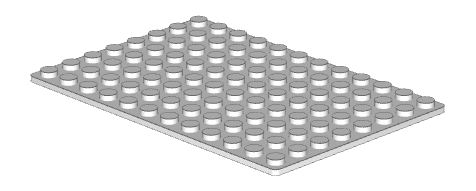
Baseplates are thinner and larger than regular plates. They lack tubes, so you can only build on top of them. They come in varieties as large as 48x48 studs.
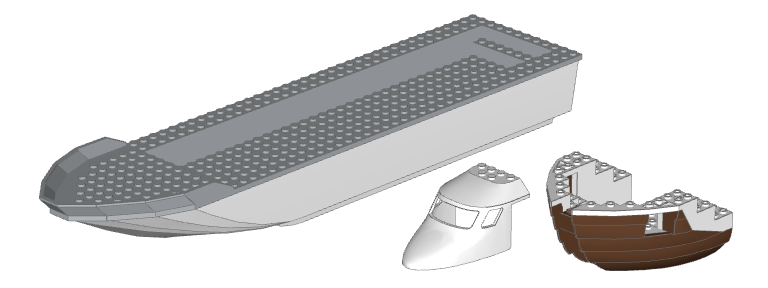
Specialized elements are elements that defy easy classification. These include boat hulls, plane bodies and other pre-molded elements.
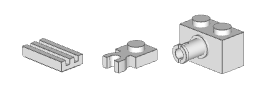
Modified elements is not really a category on its own, but a subset of the others. They are standard bricks, plates or other types that have small modifications. Grille tiles, 1x1 plates with clip or 1x2 brick with pin are all examples of modified elements.
Design ID and Element ID
If you know the size and type of a piece you can name it. But to make it easier to find each brick is also given a design ID and an element ID. The design ID is a group of pieces, and an element ID is a specific variant. Lets take a look at a basic 1x2 brick.
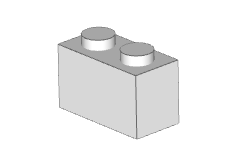
The design ID of the 1x2 brick is #3004. However, each variation of it - colors, prints, and so on - has a different element ID. The element IDs for a red and blue #3004 is #300421 and #300423. Here's Swooshable's indexed variations for #3004. If you look at that list you'll notice that similar elements seem to have multiple element IDs. There are two possible explanations for this:
- There's a slight variation between the elements.
- Different sources categorize the elements with different IDs. It happens.
Some pieces have been produced in different variations over the years. Some sources categorize these variants as different pieces, but some does not. The 1x1 modified plate with vertical clip is a good example. It is formally known as #4085. LDraw recognizes three different variations: #4085a, #4085b and #4085c. Can you spot the difference? They're all about the shape of the clip. Not all sources take these variations into account.

The design ID is molded onto each piece, but it can be difficult to read and find. Here are two design IDs - one on a plate and one on a palm tree leaf. I had to get really close and do some flash trickery to be able to capture it. You don't normally notice these numbers when you're building.
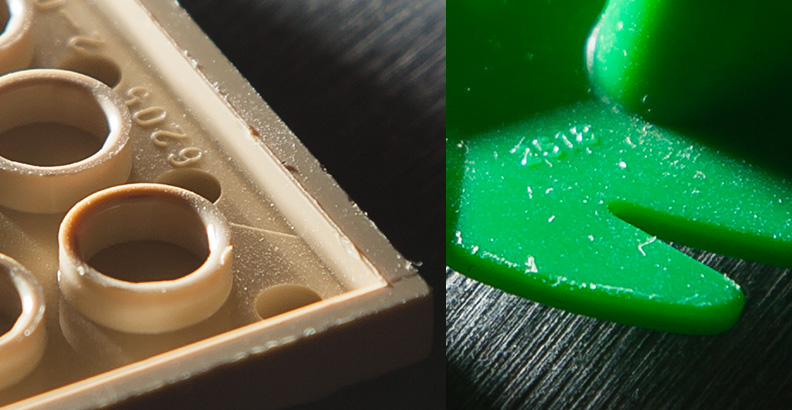
You can use the design ID to find a piece on a marketplace like Bricklink or a reference like Rebrickable. We use it here on Swooshable as well.
Techniques
Piece geometry
When you start to explore how different pieces adds up, there is one rule in particular you need to remember. It’s an important one:
Five plates high is two studs wide.
This is called the 5:2 ratio.
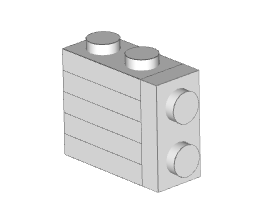
This holds true if you multiply it, so 10 plates high equals 4 studs wide. And since three plates equals one brick, you can also stack 5 bricks (15 plates) and have them match 6 studs.
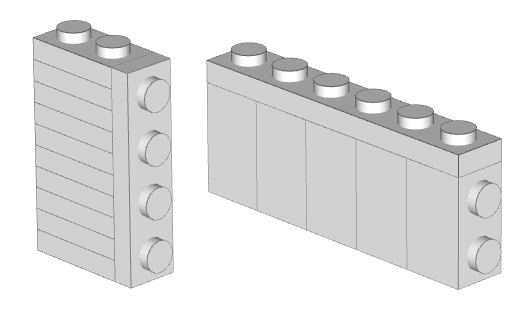
When we say that five plates match 2 studs wide, we do not take the studs on the top plate into account. If you want to build with these you need to either flatten the stack with a tile or use a brick that handles the studs. Technic bricks are good for this.
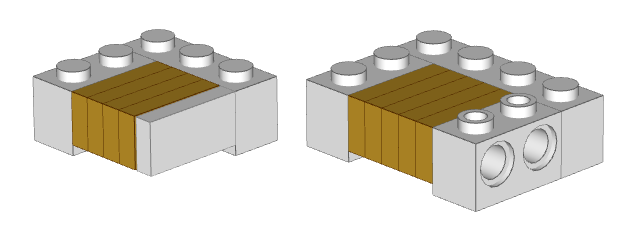
Knowing this ratio you can bridge any gap that you can measure in an even amount of studs. But what about uneven stud gaps? That’s when we’ll use one of the most iconic and versatile elements of all time: the headlight brick (#4070).
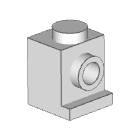
The headlight brick has a small recess that is 0.5 plates thick. By using this recess and lessen the amount of plates, you can bridge uneven stud gaps.
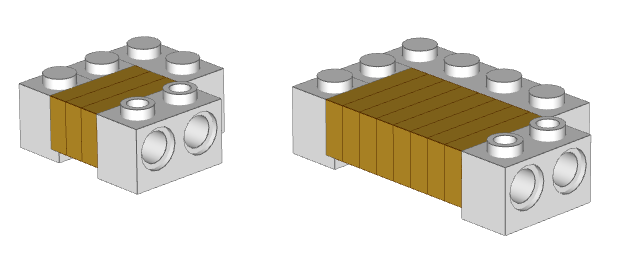
There are other elements that help you achieve this. But how is this possible? Let’s get into the mathematics of it all by introducing a LEGO specific unit: the LDU.
LDU, the smallest LEGO unit
We can measure LEGO pieces in many different units, but the most useful one is called LDU. It originated in the LDraw community. LDraw is a standard for virtual LEGO bricks (enabling, among things, a suite of LEGO CAD programs). They needed piece measurements that didn't use fractions, and the LDraw Unit - or LDU - was born.
LDU is the smallest LEGO unit. Once you understand it, it will help you calculate sizes and ensure techniques are within the LEGO system.
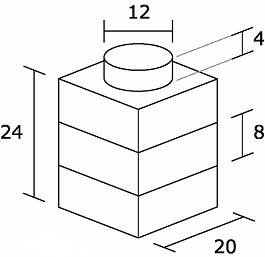
A standard brick is 24 LDU tall. Since a plate is 1/3rd of a brick, a plate is 8 LDU tall. The width of a 1x1 brick is 20 LDU. Here is a 1x1 brick in LDU’s (image courtesy of LDraw).
So how do we use the LDU? It helps a great deal when we analyze pieces. Take the headlight brick, for instance. In the piece geometry chapter we mentioned that the recess was half a plate. Since a plate is 8 LDU, the recess is 4 LDU (image courtesy of Holger Matthes).
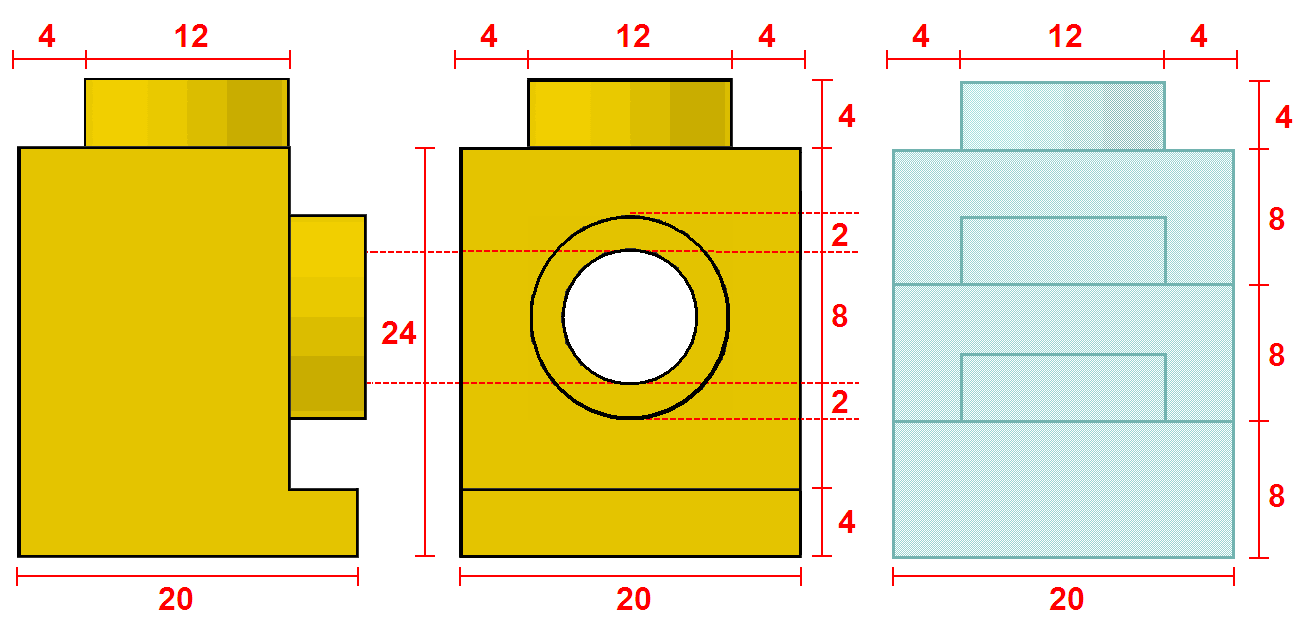
So when we had to calculate how to bridge a gap of one stud, we knew that we really had to bridge a gap of 20 LDU. And one brick (or three plates) is 24 LDU. That meant we had to find a way to remove 4 LDU’s... which is exactly what the headlight brick offered.
You will often see LDU mentioned on Swooshable or other places when we analyze techniques. It might be a bit tricky to understand at first, but don’t be afraid of it. It will likely become one of your best friends.
Studlessness: removing the studs
A common term you’ll see is studlessness. This has two main meanings, depending on a builder’s primary areas.
If you’re a system builder (using studs and tubes), this term refers to a set of techniques that aim to remove as many studs as possible, usually with tiles and various SNOT techniques. The primary goal is often to make a build more lifelike or, at least, less LEGO-like. The opposite in this meaning is studded. Compare this studded Tomcat by Ralph Savelsberg with the mostly studless Corsair by Mike Psiaki:

Both are terrific builders, and have made choices on how to best achieve the shape and style they were after.
If you’re a technic builder (using axles and gears) this term is often used to separate studded beams from non-studded beams. This has a great impact on brick geometry, and drastically changes how you work with your bricks. The opposite in this meaning is usually studfull.
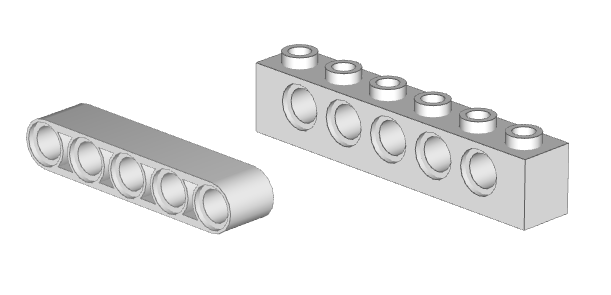
The general momentum is towards studless building - both in System and Technic. The best thing to do is to familiarize yourself with both and use whichever style you prefer.
Flex the system: SNOT means Studs Not On Top
There will come a time in your LEGO building career when you discover that it’s hard to achieve some shapes. The geometry behind LEGO pieces allow for some very interesting combinations, but they also prevent you from freeform shaping. This is where we introduce a new concept: SNOT, which stands for Studs Not On Top.
Even though studlessness sounds related to SNOT, the two are not the same. Studlessness is the art of hiding LEGO studs, while SNOT is an umbrella term for techniques that changes the orientation of studs.
If you’ve been reading this article from top to bottom, you’ve already been introduced to the concept when we discussed piece geometry.

If you combine the huge variety of LEGO pieces - not least slopes - with sensible SNOT techniques you suddenly have fantastic flexibility. We have one of the largest (and still growing!) collection of SNOT techniques here on Swooshable.
Offsetting: SNIR means Studs Not In a Row
The last technique you’ll need to familiarize yourself is offsetting. Essentially, this is the art of building between the studs.
These techniques have many names and acronyms - SNIR (Studs Not In a Row) or AZMEP (Aus-Zwei-Mach-Eins-Plättchen) are two of more common ones.
This is useful when you build on a scale that requires an uneven amount of studs. Many trains, for instance, are built 9 studs wide - but since the base is six studs wide, you need to figure out a way to change this. Many pieces allow this, but the most common one is the modified 1x2 plate with one center stud (#3794a and #3794b). This piece is so common in LEGO building it has earned itself a nickname: the jumper plate.
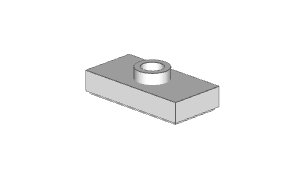
You can also use the basic studs and tubes to create a simple but inflexible offset.
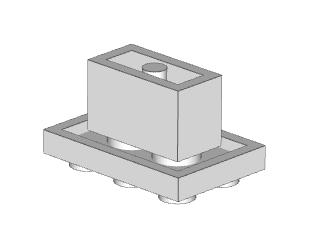
Some models you build will not use any offsetting at all, others use a lot. After a while it’ll come natural to you when it is needed, but generally speaking you’ll have to deal with it when you build in uneven stud widths.
Where to go from here
Join the community
Phew. That was a lot to take in, wasn't it? And yet there's so much more you can do! One of the best things about LEGO is that there is a thriving community where people show creations, discuss collecting, buy and sell pieces and much more. To get the most out of your hobby, consider joining! We're mostly a friendly bunch. Swooshable's community overview article is a good start.
Explore more techniques and concepts
This article gave you an overview on techniques and terms to look out for and start experimenting with. But there's still much we didn't touch. Two things you definitely should look into are how to work with color and how to plan a build. These subjects depend a lot on your personal style - some plan a lot, some plan nothing at all. Regardless, they are two important areas we encourage you to explore.
Thanks
Thanks to Dennrlay for the photo at the top and to everyone who has produced models and materials referenced in this article. I hope they inspire you to create something awesome.